AMAZING PANCAKES

Yes, that’s right– today’s post will be about PANCAKES!

This past weekend was extremely busy and stressful as I had many assignments and tests to prepare for.

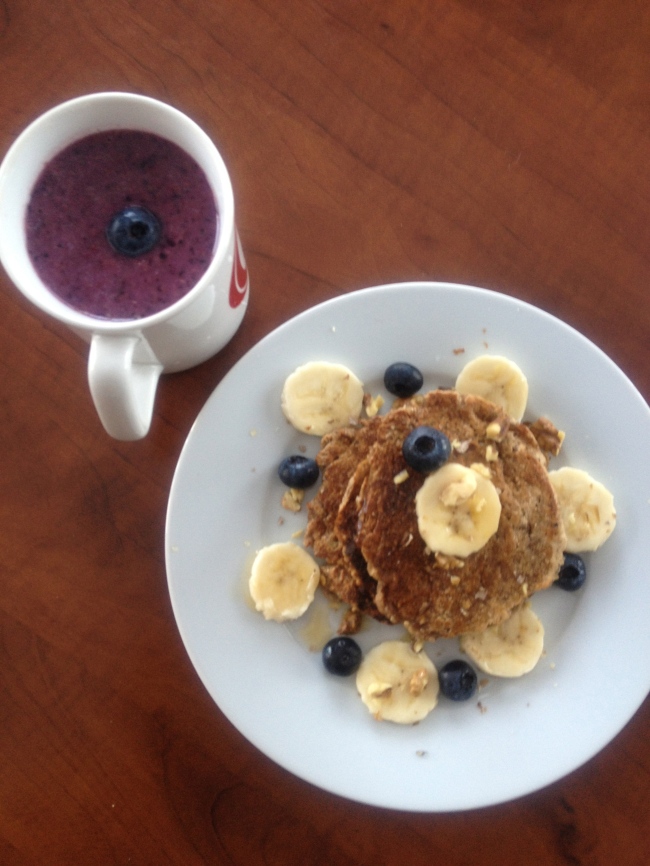
So, having completed one of my assessments today, I wanted to treat myself with pancakes. That is, Banana Bread Oat Pancakes!

It’s been a long time since i’ve indulged in this delicious recipe, so I am eager to share it with you!

Despite the fact that the recipe is gluten free and vegan, by no means does it lack in flavour.

Banana Bread Oat Pancakes: adapted fromĀ http://almondsandavocados.com/banana-bread-oat-pancakes-gluten-free-vegan/

Ingredients

– 1 cup oat flour–use gf oats if you are celiac (you can easily prepare this by grinding oats into a food processor of a high speed blender until it becomes a flour)

– 1 tsp baking powder

-1/2 tsp cinnamon

– 2 small bananas

– 1/4 + 1 tbsp almond milk (or any other dairy free alternative)

– 2 tsp ground flaxeed

– 2 tsp maple syrup (you can omit, I did because my bananas were extremely ripe and bursting with sugary flavour)

– 1/2 tbsp coconut oil (or grapeseed or EVOO)

– 2 tsp vanilla extract (I LOVE THIS STUFF)

Instructions

1. In a mixing bowl, combine all the dry ingredients, and mix until incorporated

2. In another bowl, mash the bananas with a fork and add in your milk, flaxseed, maples syrup, oil, and vanilla and mix the batter. Alternatively, you can use a blender or food processor for this step

3. Add your wet ingredients into the dry and mix until incorporated

4. Head some oil in a pan, and once it is hot enough, pour the batter into the pan. When you see bubbles form on the surface of the batter and the edges of your pancake turns brown, flip and cook until the bottom has browned.

5. Serve with maple syrup/ agave/ Nutella and top with toppings of your choice! As well, feel free to whip up a smoothie to go along with your banana pancakes. I did a mix between blueberries, strawberries, frozen banana, watermelon, and chia

ENJOY!

Image

Why Can’t There be Waffles Every Morning?

In light of the past new rainy and dark days, this morning was actually quite nice! So, in celebration of the sun coming out, I decided to make gluten free and vegan banana walnut waffles– YUM!

These waffles were delicious! Every bite into them had crunch from the walnuts as well as sweet flavour from the bananas. The best part about these waffles was that there was NO sugar added whatsoever.

Gluten Free Vegan Banana Walnut Waffles or Pancakes (whatever you prefer!)

Adapted from My New Roots

– 1/3 cup walnuts

– 2/3 cup rolled oats (I used Bob’s Red Mills Gluten Free Oats)

– 1 tsp cinnamon

– One and a half ripe banana

– 1 tsp. vanilla extract

– 1 tsp. coconut oil (EVOO, Grapeseed, or any other oil is fine)

– 2/3 cup almond milk (or any other non-dairy milk– if you want to make the recipe dairy-free)

– 2 tsp. maple syrup

– Feel free to add any chocolate chips (Be sure to check that they are dairy free if you want to make dairy free waffles/pancakes)

The Ingredients (Although a half of a banana is missing!)

The Ingredients (Although a half of a banana is missing!)


Directions:

Place the walnuts in a high powered blender, such as a Vitamix or Blendtec (or even a food processor) and pulse the walnuts until they resemble a flour-like texture. Remove the walnut flour from the blender, and add in the oats and pulse them until they become a flour. Add both flours together as well as 1 tsp of cinnamon.

In another bowl, mash the banana, and add in the liquid ingredients and mix them.

Banana and Vanilla Extract

Banana and Vanilla Extract

Add the wet ingredients into the dry ingredients, and mix until well combined.

Mixed batter

Mixed batter


Heat a little oil onto a skillet or waffle iron, and add in the waffle/pancake batter. If making pancakes, check to see if the bottom has browned, once it has, then it can be flipped. If making waffles, sit back and relax until the waffle iron is done cooking. I let my waffles sit in the iron for a bit longer because I was afraid of the batter sticking to the iron. So, if you are planning on using a waffle iron, leave it longer, for the waffle to fully cook.

ALMOST perfect waffle

ALMOST perfect waffle

Once the cooking is completed, feel free to add some toppings to it!

ENJOY!

DSC03953

DSC03954